macOS Sequoia – Troubleshooting and Problem‑Solving Guide

20 steps (updated May 2025)
Updated edition of the historic “Mac OS X: Troubleshooting and Problem‑Solving Guide” by Mac Peer.
Heads‑up : Some procedures apply only to Intel‑based Macs; steps for Apple Silicon (M1‑M3) are flagged where relevant.
When to use this guide: Work through the steps in order whenever your Mac slows down, freezes, crashes, or otherwise misbehaves. After each step, check whether the issue is fixed before moving on.
At a glance
01 Restart │ 02 Check free space │ 03 (Obsolete) Repair permissions │ 04 First Aid disk │ 05 New user │ 06 Clear caches (only if needed) │ 07 REMOVED prebinding │ 08 Safe Boot │ 09 Reset NVRAM/PRAM │ 10 (Legacy) open‑firmware reset │ 11 Disconnect peripherals │ 12 Reinstall / update macOS │ 13 Apple Diagnostics │ 14 Check SSD/HDD health │ 15 Remove added RAM (Intel) │ 16 Remove PCIe cards (Mac Pro) │ 17 Reset SMC / power management │ 18 Clean reinstall (Recovery / Erase All Content) │ 19 Restore from backup │ 20 Apple Support
01 Restart
A simple restart often clears temporary glitches. If the issue does not return, it was likely transient.
02 Make sure there’s enough free space on the startup volume
macOS needs 10–20 % of free disk space for swap files, APFS snapshots, and system updates. Check with > System Settings > General > Storage and remove large or unneeded files.
03 (Obsolete) Repair permissions
Since OS X El Capitan (10.11) the system protects its own files automatically; Disk Utility no longer offers a “Repair Permissions” button. Forget about this step.
04 Run First Aid on the startup disk
- macOS Sequoia: open Disk Utility › First Aid on your APFS volume.
- If the Mac won’t boot: enter macOS Recovery (hold Power on Apple Silicon, or ⌘‑R on Intel) and run First Aid from there.
05 Create a new user account
Create a temporary user under > System Settings > Users & Groups. If the problem disappears when logged into the new account, the issue is confined to the original user’s Library.
06 Clear system and user caches (only if necessary)
macOS normally prunes caches automatically. You can force a clean‑up by booting into Safe Mode (see step 08) or manually deleting ~/Library/Caches, but do this only when troubleshooting a clear cache‑related problem.
07 Removed – Force system prebinding
The update_prebinding command disappeared after OS X Snow Leopard; the functionality is baked into modern macOS.
08 Boot in Safe Mode
- Apple Silicon: shut down → press and hold Power until Startup Options appear → select your volume → hold Shift and click Continue in Safe Mode.
- Intel: power on while holding Shift.
Safe Mode disables third‑party extensions, clears certain caches, and performs a disk check on startup.
09 Reset NVRAM/PRAM
- Intel: power on and hold ⌥‑⌘‑P‑R for two startup chimes.
- Apple Silicon: a normal restart resets NVRAM automatically; no key combo is required.
10 (Legacy) Reset open‑firmware / NVRAM PPC
Applies only to PowerPC Macs, which are no longer supported.
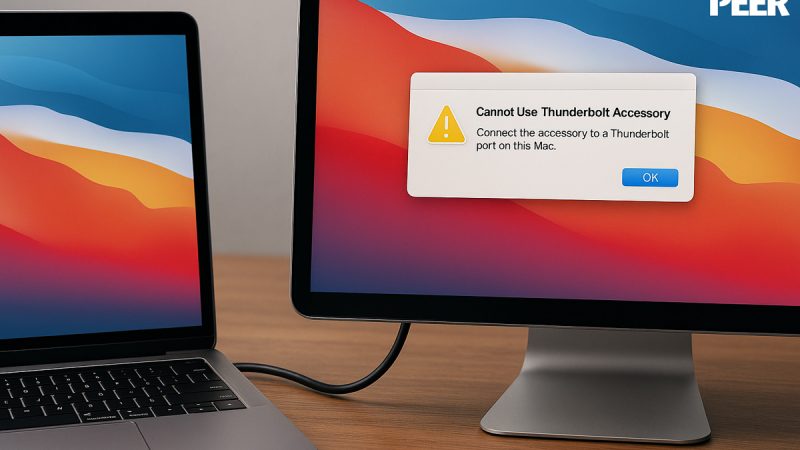
11 Disconnect external USB/Thunderbolt devices
Restart with only the Apple keyboard and mouse connected to rule out hardware or driver conflicts.
12 Reinstall / update macOS
“Combo updates” vanished after macOS Big Sur. To refresh the system download the full macOS Sequoia installerfrom the Mac App Store or choose Reinstall macOS in Recovery. Your data remains intact.
13 Run Apple Diagnostics
- Apple Silicon: from Startup Options press ⌘‑D.
- Intel: power on holding D (or ⌥‑D for Internet Diagnostics).
Note any reference codes produced.
14 Check for bad blocks / SSD health
In Disk Utility choose View › Show All Devices, select the physical disk and review the SMART/Health information. Third‑party tools like DriveDx or TechTool Pro offer more granular data. Back up immediately if errors appear.
15 Remove added RAM modules
Only relevant for Intel Macs with user‑replaceable RAM. Test each module individually to isolate faulty DIMMs.
16 Remove third‑party PCIe cards
Pertains exclusively to the Mac Pro. Ensure you have the latest firmware and drivers from the card manufacturer.
17 Reset SMC / power management
- Intel without T2: follow the Apple support instructions for your model.
- Intel with T2: press Control‑Option‑Shift (left side) + Power for 10 seconds, then release and start normally.
- Apple Silicon: the SMC is integrated; shut down for 30 seconds or simply restart.
18 Clean reinstall
If previous steps fail:
- In Recovery select Reinstall macOS (keeps data).
- Or choose Erase All Content and Settings (System Settings > General > Transfer or Reset).
19 Restore from backup
Use Time Machine or an APFS clone to roll the entire system back to a working state.
20 Contact Apple Support
If hardware tests fail or the anomaly persists, reach out to Apple Support or an Apple Authorised Service Provider (AASP).
© 2025 Mac Peer – Revision by MAC PEER